在 Objectice-C 或 C++ 项目中,使用字符串预编译加密可以有效防止代码被逆向工程。使用 js 加密生成 16 进行数组拷贝到项目中是一种解决方法,还可以使用开源宏定义域编译或者使用开源项目插件来防止逆向。这些方法可以有效防止程序中的敏感代码被逆向工程,并保护代码的可维护性和安全性。obfuscator-llvm、STCObfuscator、Obfuscator-iOS 等。
1.使用 js 加密生成 16 进行数组拷贝到项目 调用解密
AES 加密等加密
JS 生成加密字符串数据可以使用常见的加密算法,例如 AES、DES、RSA 等。以下是使用 AES 算法生成加密字符串数据的示例代码:
// 密钥
const key = "0123456789abcdef0123456789abcdef";
// 原始数据
const data = "hello world";

// 加密
const aesEncrypt = (data, key) => {
  const cipher = crypto.createCipheriv("aes-256-cbc", key, key.slice(0, 16));
  let encrypted = cipher.update(data, "utf8", "hex");
  encrypted += cipher.final("hex");
  return encrypted;
};

const encrypted = aesEncrypt(data, key);
console.log(encrypted); // 3f6dd8b6a402bda28077c0bf

// 将16进制字符串转为16进制数组
const hexToArray = hex => {
  const array = new Uint8Array(hex.length / 2);
  for (let i = 0; i < hex.length; i += 2) {
    array[i / 2] = parseInt(hex.substr(i, 2), 16);
  }
  return array;
};

const encryptedArray = hexToArray(encrypted);
console.log(encryptedArray); // [63, 109, 216, 182, 164, 2, 189, 162, 128, 119, 192, 191]
Objective-C++解密函数可以使用相应的解密算法进行解密,例如以下是使用 AES 算法进行解密的示例代码:
[hidecontent type=“reply”]
#import <Foundation/Foundation.h>
#import <CommonCrypto/CommonCryptor.h>

NSData* aesDecrypt(NSData *data, NSData *key) {
    // 加密算法为AES,模式为CBC,填充方式为PKCS7Padding
    const NSUInteger kAlgorithm = kCCAlgorithmAES;
    const NSUInteger kMode = kCCModeCBC;
    const NSUInteger kPadding = kCCOptionPKCS7Padding;

    // 初始化向量
    const char iv[16] = {0};

    // 设置密钥
    const void *keyPtr = [key bytes];
    const NSUInteger keyLength = [key length];

    // 分配内存
    size_t bufferSize = [data length] + kCCBlockSizeAES128;
    void *buffer = malloc(bufferSize);

    // 解密
    size_t bytesDecrypted = 0;
    CCCryptorStatus result = CCCrypt(kCCDecrypt, kAlgorithm, kPadding,
                                     keyPtr, keyLength, iv,
                                     [data bytes], [data length],
                                     buffer, bufferSize, &bytesDecrypted);

    // 返回解密后的数据
    NSData *resultData = nil;
    if (result == kCCSuccess) {
        resultData = [NSData dataWithBytesNoCopy:buffer length:bytesDecrypted];
    } else {
        free(buffer);
        @throw [NSException exceptionWithName:@"DecryptException"
                                       reason:@"解密失败"
                                     userInfo:nil];
    }
    return resultData;
}

int main(int argc, const char * argv[]) {
    @autoreleasepool {
        // 密钥
        NSString *keyString = @"0123456789abcdef0123456789abcdef";
        NSData *keyData = [keyString dataUsingEncoding:NSUTF8StringEncoding];

        // 加密后的数据(16进制数组)
        const unsigned char encryptedArray[] = {0x3f, 0x6d, 0xd8, 0xb6, ...];
        // 将16进制数组转为NSData对象
        NSData *encryptedData = [NSData dataWithBytes:encryptedArray length:sizeof(encryptedArray)];

        // 解密
        NSData *decryptedData = aesDecrypt(encryptedData, keyData);
        NSString *decryptedString = [[NSString alloc] initWithData:decryptedData encoding:NSUTF8StringEncoding];

        // 打印解密后的字符串
        NSLog(@"%@", decryptedString);
    }
        return 0;
}
注意:以上代码仅作为示例,实际使用时应当根据具体需求选择合适的加密算法、填充方式等,并进行适当的安全性优化。
[/hidecontent]
位运算等基本操作进行加密
使用位运算等基本操作进行加密,安全性会比较低,容易被破解,不建议在实际应用中使用。以下是使用位运算等基本操作进行加密的示例代码:
// 原始数据
const data = "hello world";

// 加密
const encrypt = data => {
  const key = 0x7f; // 密钥为0x7f
  let encrypted = "";
  for (let i = 0; i < data.length; i++) {
    const c = data.charCodeAt(i) ^ key; // 使用异或进行加密
    encrypted += c.toString(16); // 转为16进制字符串
  }
  return encrypted;
};

const encrypted = encrypt(data);
console.log(encrypted); // 5e5c5f5c5b3e5c5f5d

// 将16进制字符串转为16进制数组
const hexToArray = hex => {
  const array = new Uint8Array(hex.length / 2);
  for (let i = 0; i < hex.length; i += 2) {
    array[i / 2] = parseInt(hex.substr(i, 2), 16);
  }
  return array;
};

const encryptedArray = hexToArray(encrypted);
console.log(encryptedArray); // [94, 92, 95, 92, 91, 62, 92, 95, 93]
Objective-C++解密函数可以使用相应的解密算法进行解密,例如以下是使用异或进行解密的示例代码:
[hidecontent type=“reply”]
#import <Foundation/Foundation.h>

NSData* decrypt(NSData *data, int key) {
    const NSUInteger length = [data length];
    unsigned char *bytes = (unsigned char *)malloc(length);
    [data getBytes:bytes length:length];

    for (NSUInteger i = 0; i < length; i++) {
        bytes[i] ^= key; // 使用异或进行解密
    }

    return [NSData dataWithBytesNoCopy:bytes length:length];
}

int main(int argc, const char * argv[]) {
    @autoreleasepool {
        // 加密后的数据(16进制数组)
        const unsigned char encryptedArray[] = {0x5e, 0x5c, 0x5f, 0x5c, 0x5b, 0x3e, 0x5c, 0x5f, 0x5d};
        NSData *encryptedData = [NSData dataWithBytes:encryptedArray length:sizeof(encryptedArray)];

        // 解密
        NSData *decryptedData = decrypt(encryptedData, 0x7f);
        NSString *decryptedString = [[NSString alloc] initWithData:decryptedData encoding:NSUTF8StringEncoding];

        // 打印解密后的字符串
        NSLog(@"%@", decryptedString);
    }
    return 0;
}
[/hidecontent]
2.使用开源宏定义域编译
在项目中保存此文件并在最顶部引入,然后将编译环境最低设置为 c++11,然后就可以使用此宏定义头文件了。
Obtuse.h:
[hidecontent type=“reply”]
#include <stdio.h>
#include <stdint.h>

//-------------------------------------------------------------//
// "Malware related compile-time hacks with C++11" by LeFF   //
// You can use this code however you like, I just don't really //
// give a shit, but if you feel some respect for me, please //
// don't cut off this comment when copy-pasting... ;-)       //
//-------------------------------------------------------------//

#if defined(_MSC_VER)
#define ALWAYS_INLINE __forceinline
#else
#define ALWAYS_INLINE __attribute__((always_inline))
#endif

// Usage examples:
void setup()    __attribute__((noinline));
void startAuthentication()  __attribute__((noinline));

#ifndef seed
    // I use current (compile time) as a seed
    // Convert time string (hh:mm:ss) into a number
    constexpr int seedToInt(char c) { return c - '0'; }
    const int seed = seedToInt(__TIME__[7]) +
                     seedToInt(__TIME__[6]) * 10 +
                     seedToInt(__TIME__[4]) * 60 +
                     seedToInt(__TIME__[3]) * 600 +
                     seedToInt(__TIME__[1]) * 3600 +
                     seedToInt(__TIME__[0]) * 36000;
#endif

// The constantify template is used to make sure that the result of constexpr
// function will be computed at compile-time instead of run-time
template <uintptr_t Const> struct
vxCplConstantify { enum { Value = Const }; };

// Compile-time mod of a linear congruential pseudorandom number generator,
// the actual algorithm was taken from "Numerical Recipes" book
constexpr uintptr_t vxCplRandom(uintptr_t Id)
{ return (1013904223 + 1664525 * ((Id > 0) ? (vxCplRandom(Id - 1)) : (/*vxCPLSEED*/seed))) & 0xFFFFFFFF; }

// Compile-time random macros, can be used to randomize execution
// path for separate builds, or compile-time trash code generation
#define vxRANDOM(Min, Max) (Min + (vxRAND() % (Max - Min + 1)))
#define vxRAND()           (vxCplConstantify<vxCplRandom(__COUNTER__ + 1)>::Value)

// Compile-time recursive mod of string hashing algorithm,
// the actual algorithm was taken from Qt library (this
// function isn't case sensitive due to vxCplTolower)
constexpr char   vxCplTolower(char Ch)                { return (Ch >= 'A' && Ch <= 'Z') ? (Ch - 'A' + 'a') : (Ch); }
constexpr uintptr_t vxCplHashPart3(char Ch, uintptr_t Hash) { return ((Hash << 4) + vxCplTolower(Ch)); }
constexpr uintptr_t vxCplHashPart2(char Ch, uintptr_t Hash) { return (vxCplHashPart3(Ch, Hash) ^ ((vxCplHashPart3(Ch, Hash) & 0xF0000000) >> 23)); }
constexpr uintptr_t vxCplHashPart1(char Ch, uintptr_t Hash) { return (vxCplHashPart2(Ch, Hash) & 0x0FFFFFFF); }
constexpr uintptr_t vxCplHash(const char* Str)           { return (*Str) ? (vxCplHashPart1(*Str, vxCplHash(Str + 1))) : (0); }

// Compile-time hashing macro, hash values changes using the first pseudorandom number in sequence
#define HASH(Str) (uintptr_t)(vxCplConstantify<vxCplHash(Str)>::Value ^ vxCplConstantify<vxCplRandom(1)>::Value)

// Compile-time generator for list of indexes (0, 1, 2, ...)
template <uintptr_t...> struct vxCplIndexList {};
template <typename  IndexList, uintptr_t Right> struct vxCplAppend;
template <uintptr_t... Left,      uintptr_t Right> struct vxCplAppend<vxCplIndexList<Left...>, Right> { typedef vxCplIndexList<Left..., Right> Result; };
template <uintptr_t N> struct vxCplIndexes { typedef typename vxCplAppend<typename vxCplIndexes<N - 1>::Result, N - 1>::Result Result; };
template <> struct vxCplIndexes<0> { typedef vxCplIndexList<> Result; };

// Compile-time string encryption of a single character
const char vxCplEncryptCharKey = (const char)vxRANDOM(0, 0xFF);
constexpr char ALWAYS_INLINE vxCplEncryptChar(const char Ch, uintptr_t Idx) { return Ch ^ (vxCplEncryptCharKey + Idx); }

// Compile-time string encryption class
template <typename IndexList> struct vxCplEncryptedString;
template <uintptr_t... Idx> struct vxCplEncryptedString<vxCplIndexList<Idx...> >
{
    char Value[sizeof...(Idx) + 1]; // Buffer for a string

    // Compile-time constructor
    constexpr ALWAYS_INLINE vxCplEncryptedString(const char* const Str)
    : Value{ vxCplEncryptChar(Str[Idx], Idx)... } {}

    // Run-time decryption
    inline const char* decrypt()
    {
        for(uintptr_t t = 0; t < sizeof...(Idx); t++)
        { this->Value[t] = this->Value[t] ^ (vxCplEncryptCharKey + t); }
        this->Value[sizeof...(Idx)] = '\0'; return this->Value;
    }
};

// Compile-time string encryption macro
#define ENCRYPT(Str) (vxCplEncryptedString<vxCplIndexes<sizeof(Str) - 1>::Result>(Str).decrypt())

#ifdef __APPLE__
// Compile-time Objective-c string encryption macro
#define NSSENCRYPT(Str) @(ENCRYPT(Str))
#endif

// Compile-time offset string encryption macro, converts back to uint64_t.
#define ENCRYPTOFFSET(Str) strtoull(ENCRYPT(Str), NULL, 0)

// Compile-time hex string encryption macro, does same as ENCRYPT, but the naming is just more clear.
#define ENCRYPTHEX(Str) ENCRYPT(Str)
[/hidecontent]
用法:
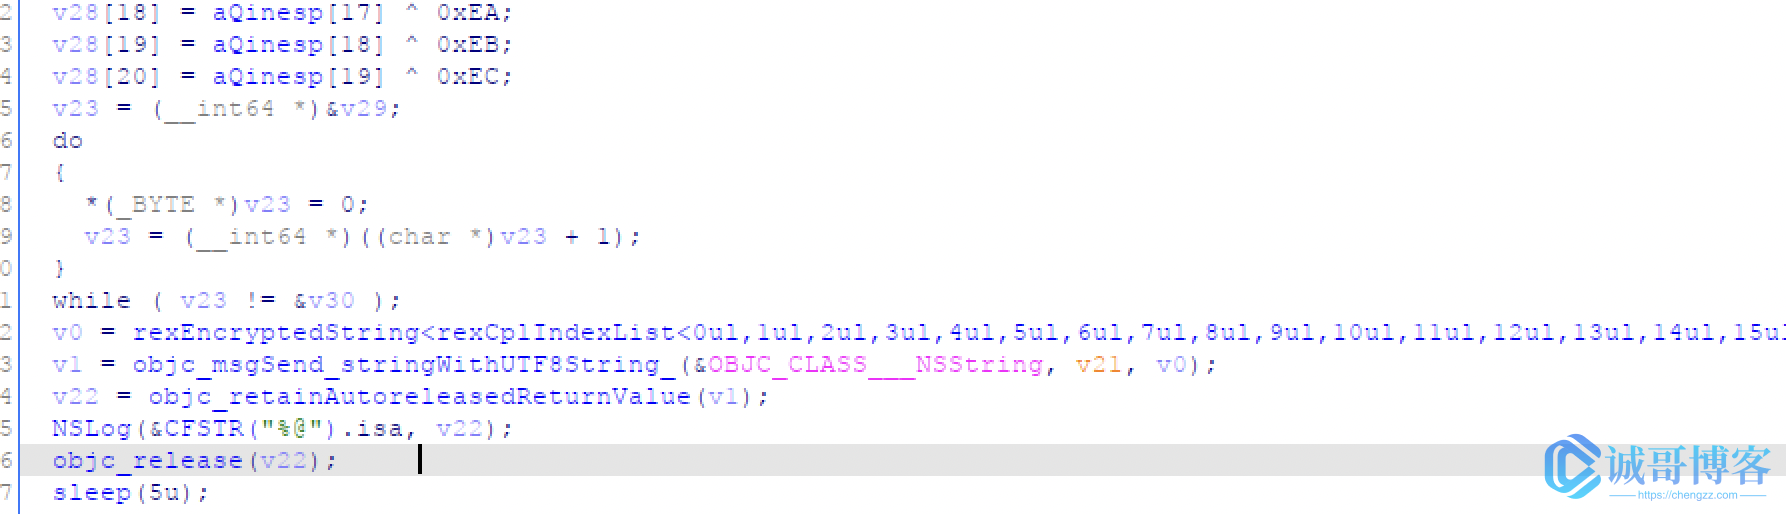
NSSENCRYPT("诚哥博客"); //等同 @"诚哥博客"
ENCRYPT("诚哥博客"); //等同 "诚哥博客"
使用逆向工具,伪代码是看不出来的。当然并非无解。
3.使用开源项目插件等
Obfuscator-iOS
通过模糊处理所有硬编码的安全敏感字符串来保护应用。此库通过模糊处理然后编码为十六进制,将典型的 NSString 硬编码为 C 语言字符串。 当你的应用需要原始的未混淆的 NSString 时,它会动态地将其解码回来。
开源地址: https://github.com/pjebs/Obfuscator-iOS
STCObfuscator
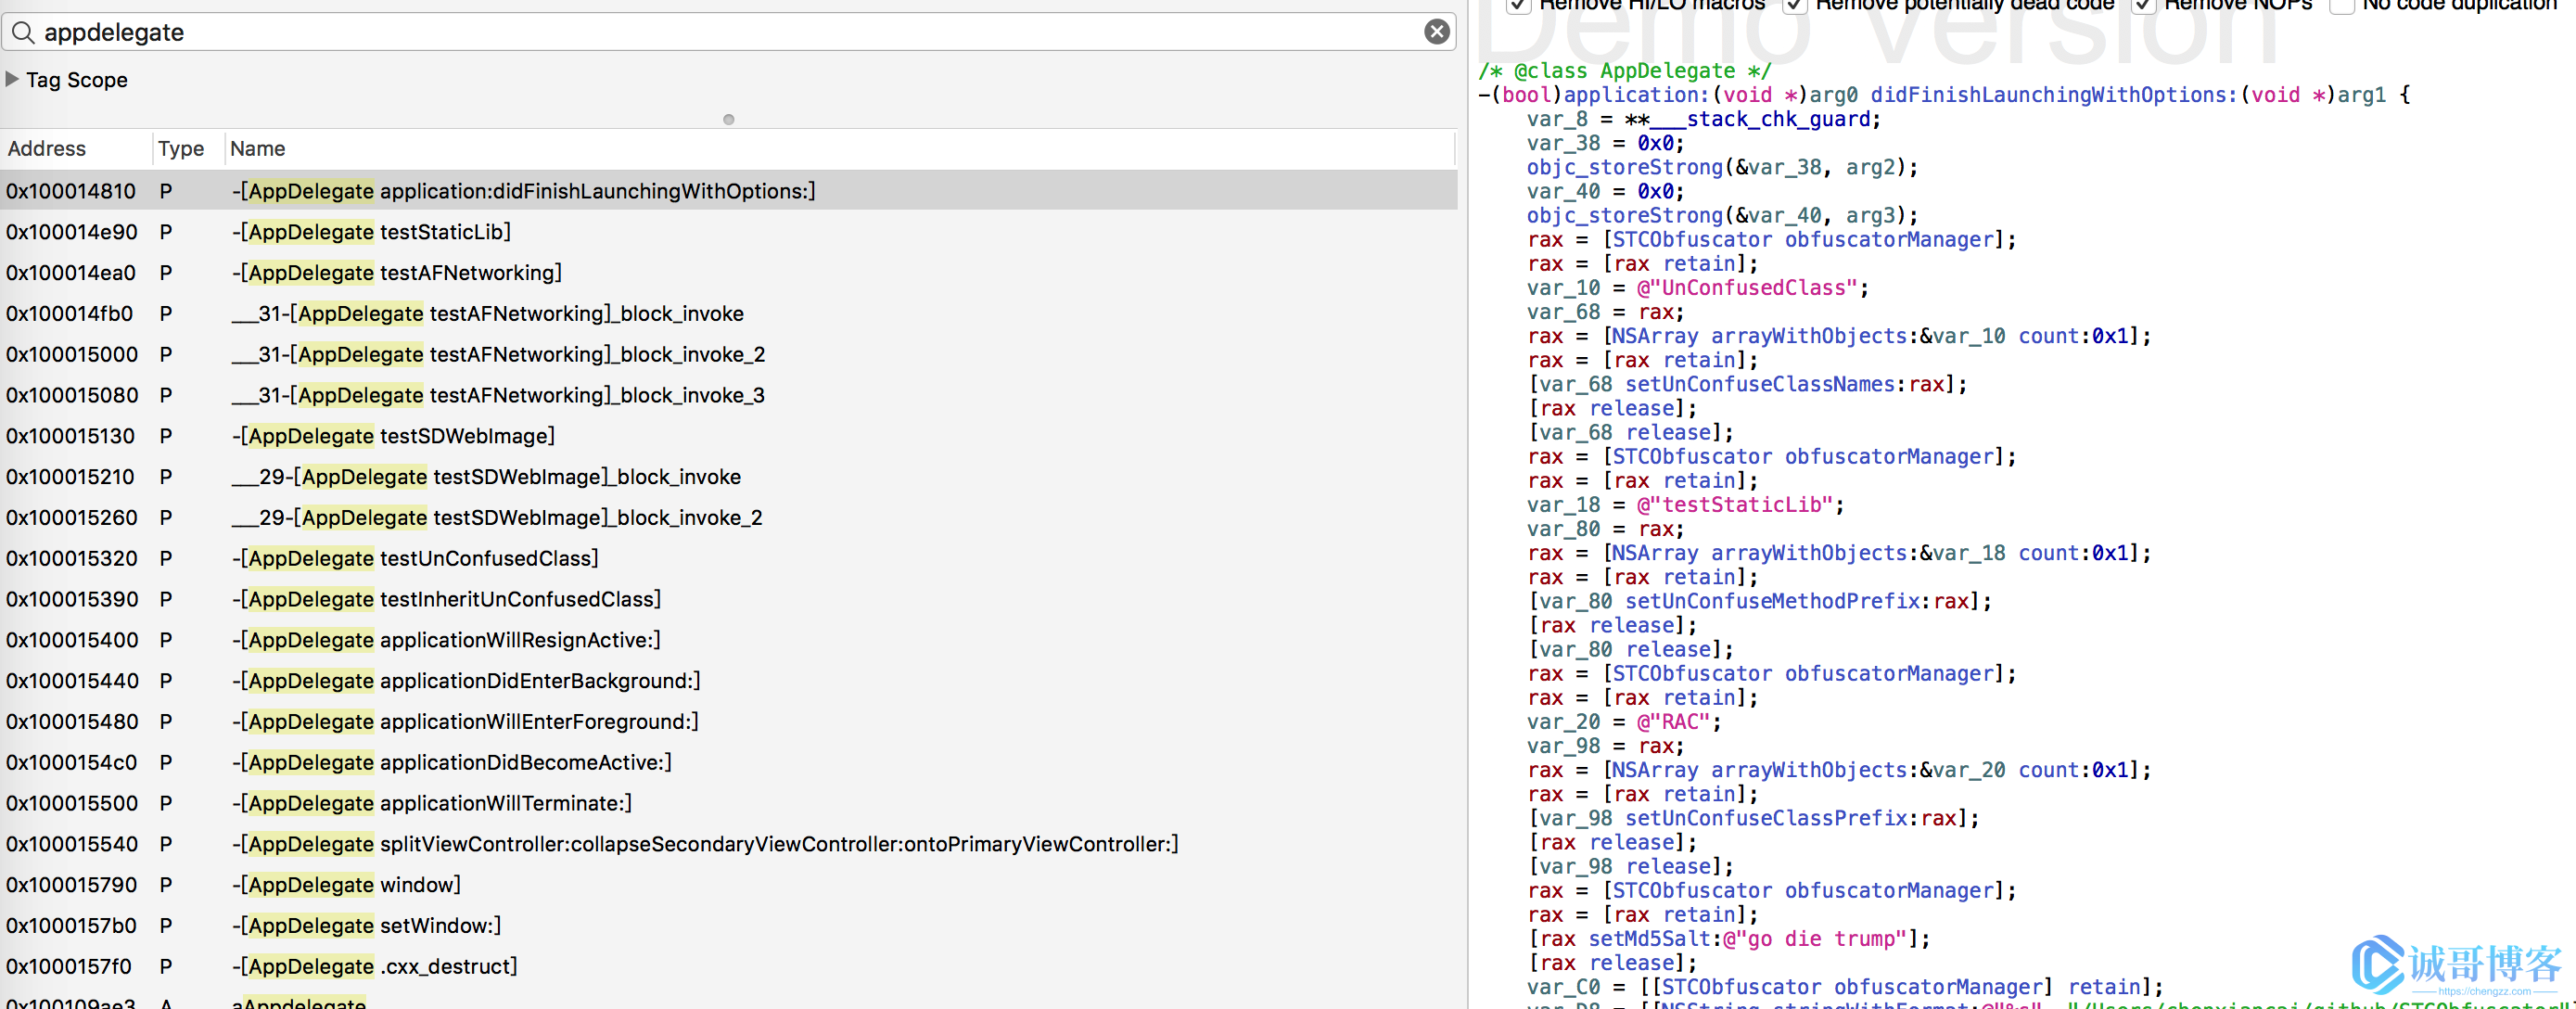
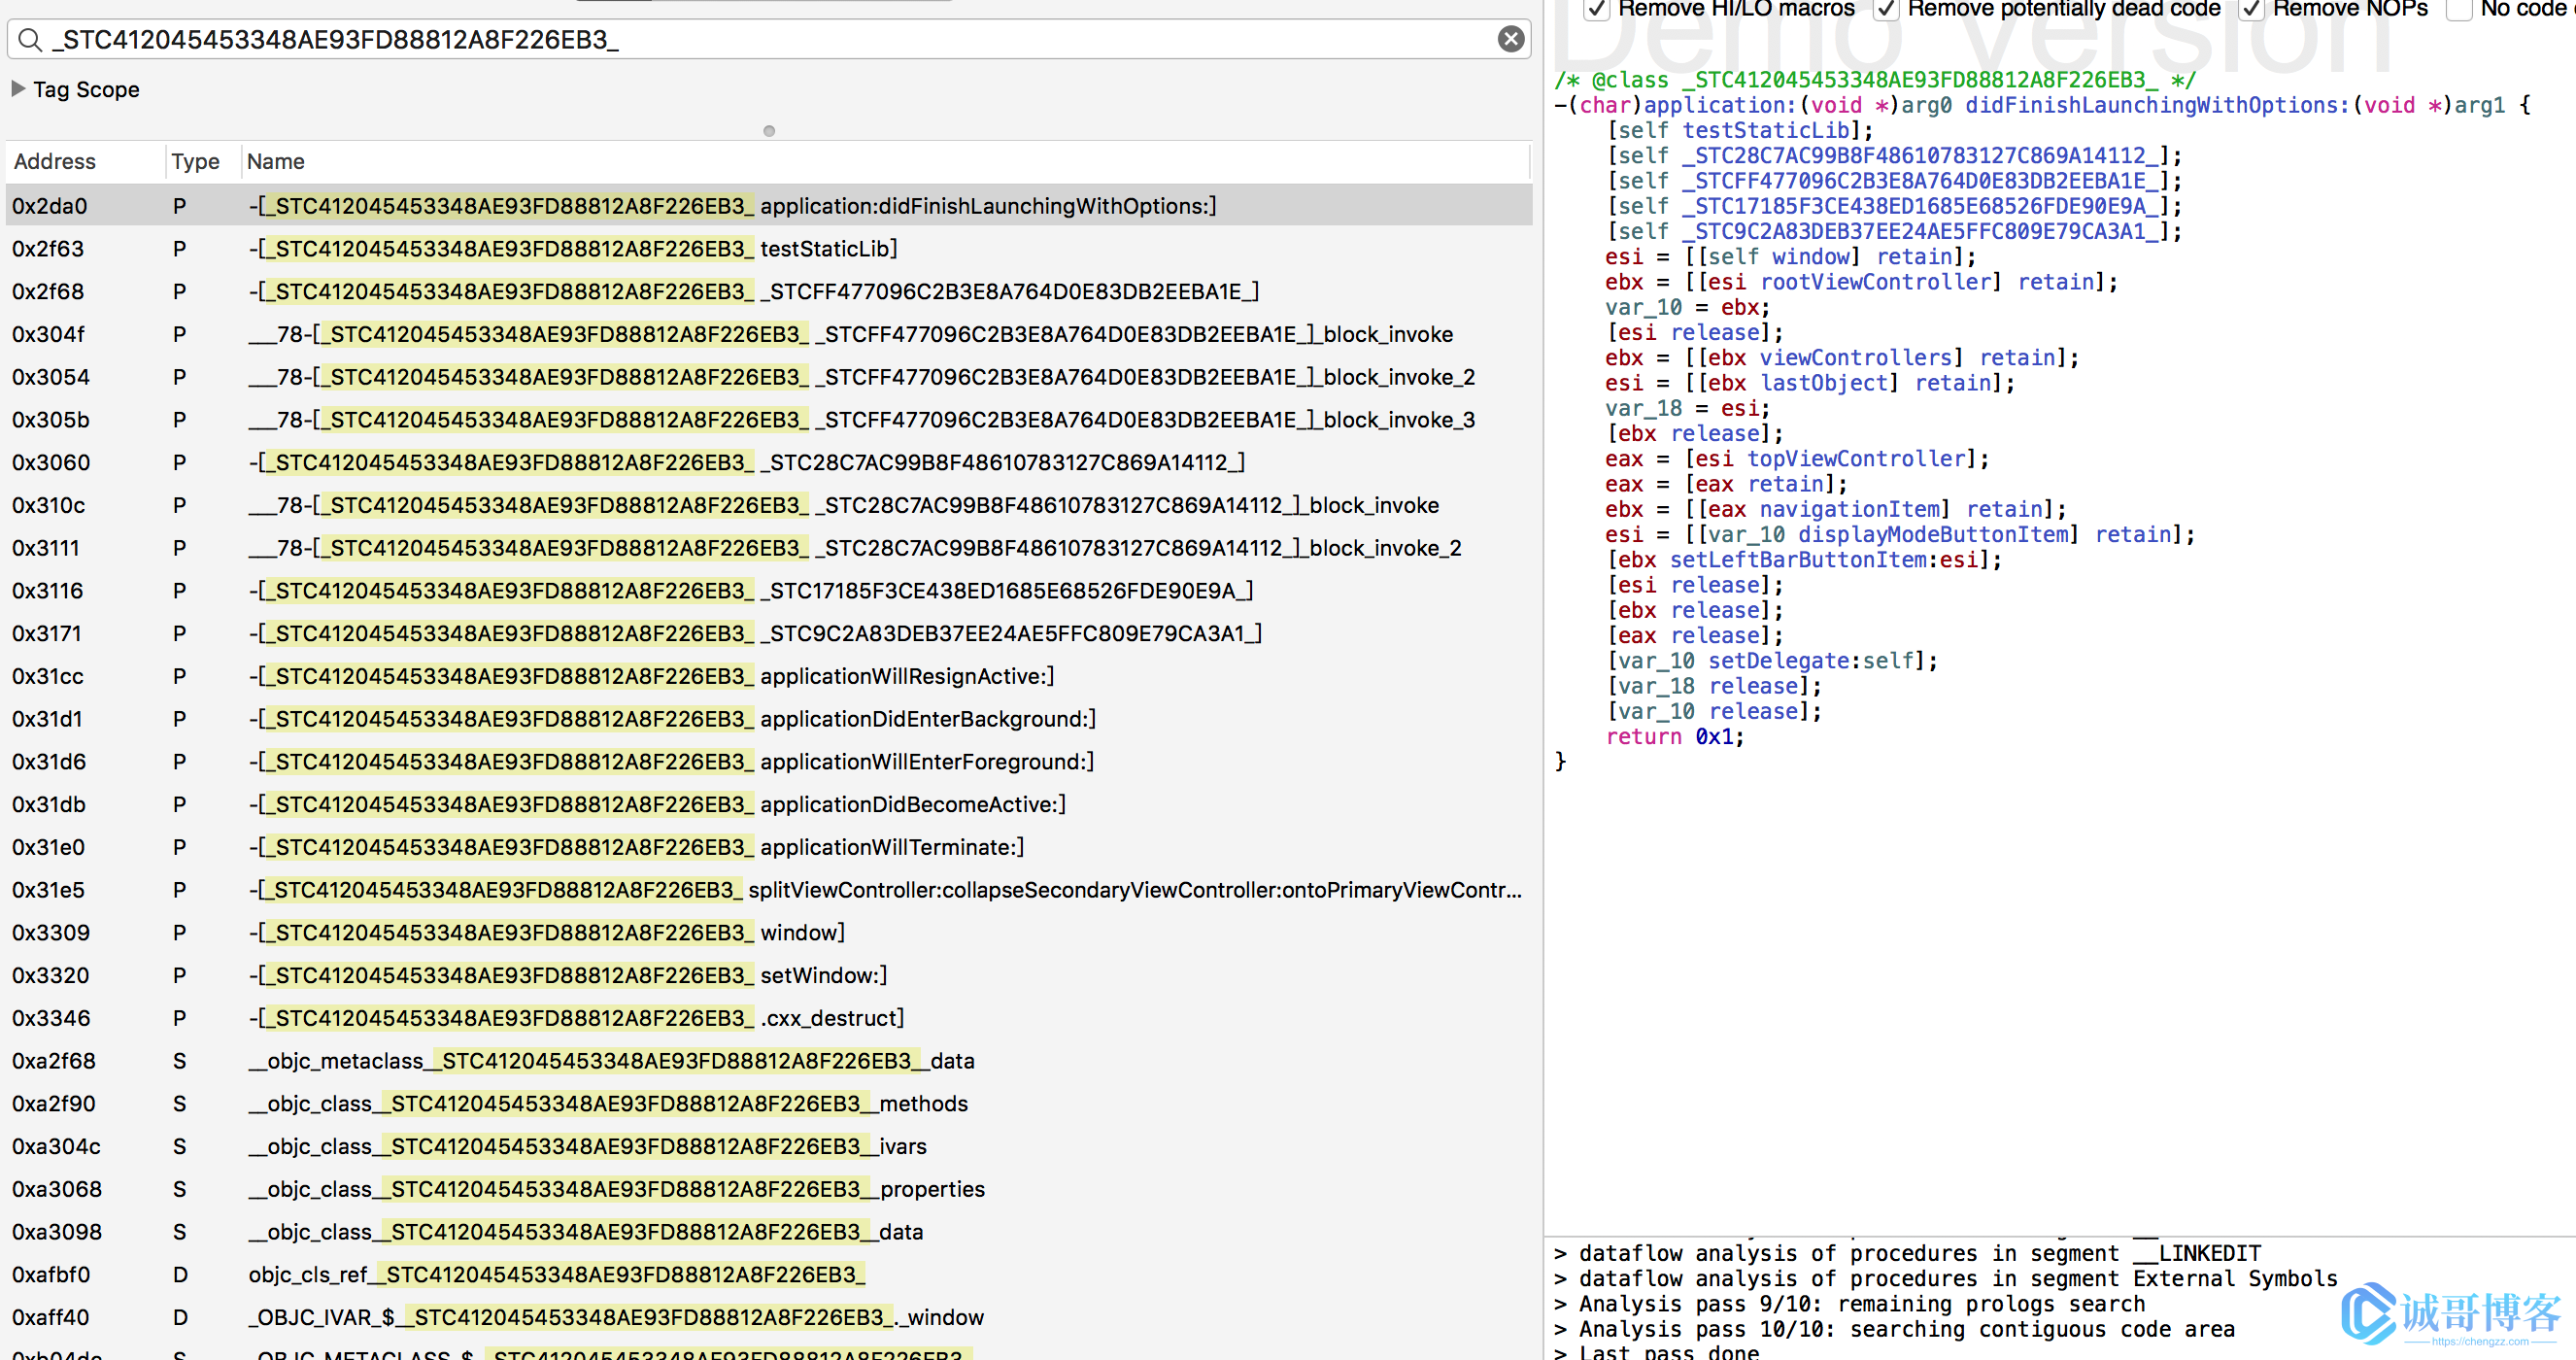
iOS 全局自动化 代码混淆 工具!支持 cocoapod 组件代码一并 混淆,完美避开 hardcode 方法、静态库方法和系统库方法!STCObfuscator 是用来进行 object-c 代码混淆的工具,在模拟器 DEBUG 环境下运行生成混淆宏, 混淆的宏可以在其他环境下进行编译,支持 Cocoapod 代码混淆.
开源地址: https://github.com/chenxiancai/STCObfuscator
混淆前后效果图:
obfuscator-llvm
Obfuscator-LLVM 是 2010 年 6 月由伊韦尔东莱班应用科学与艺术大学信息安全小组 ( HEIG-VD ) 发起的一个项目。
该项目的目的是提供 LLVM 编译套件的开源分支,能够通过代码混淆和防篡改提供更高的软件安全性。由于我们目前主要在中间表示(IR) 级别工作,因此我们的工具兼容所有编程语言(C、C++、Objective-C、Ada 和 Fortran)和目标平台(x86、x86-64、PowerPC、PowerPC-64) , ARM, Thumb, SPARC, Alpha, CellSPU, MIPS, MSP430, SystemZ, 和 XCore)目前由 LLVM 支持。
Obfuscator-LLVM 是一个基于 LLVM 框架开发的代码混淆器,其原始仓库地址为: https://github.com/obfuscator-llvm/obfuscator
你可以通过上述地址访问 Obfuscator-LLVM 的原始代码,获取最新版本的源码、文档等信息。同时,Obfuscator-LLVM 也提供了一些文档和示例代码,方便用户了解和使用该工具。
Obfuscator-LLVM 是一个基于 LLVM 框架开发的代码混淆器,它可以帮助开发人员加固和保护他们的软件,使得黑客和逆向工程师更难破解和盗用代码。以下是 Obfuscator-LLVM 混淆器的一些优点:
- 代码保护:Obfuscator-LLVM 可以对软件代码进行混淆,从而保护代码免受恶意攻击和盗用。
- 抵御反编译:Obfuscator-LLVM 可以通过修改代码的控制流、混淆符号等方式来增加反编译的难度,使得黑客更难破解和分析代码。
- 保护软件知识产权:Obfuscator-LLVM 可以帮助软件开发者保护他们的知识产权,避免代码被盗用和滥用。
- 提高软件安全性:Obfuscator-LLVM 可以通过增加代码混淆、模糊和随机性等方式来提高软件的安全性和鲁棒性。
- 提高软件性能:Obfuscator-LLVM 可以通过对代码进行优化和精简,从而提高软件的性能和效率。
综上所述,Obfuscator-LLVM 混淆器可以帮助软件开发者加固和保护他们的软件,提高软件的安全性、性能和稳定性。
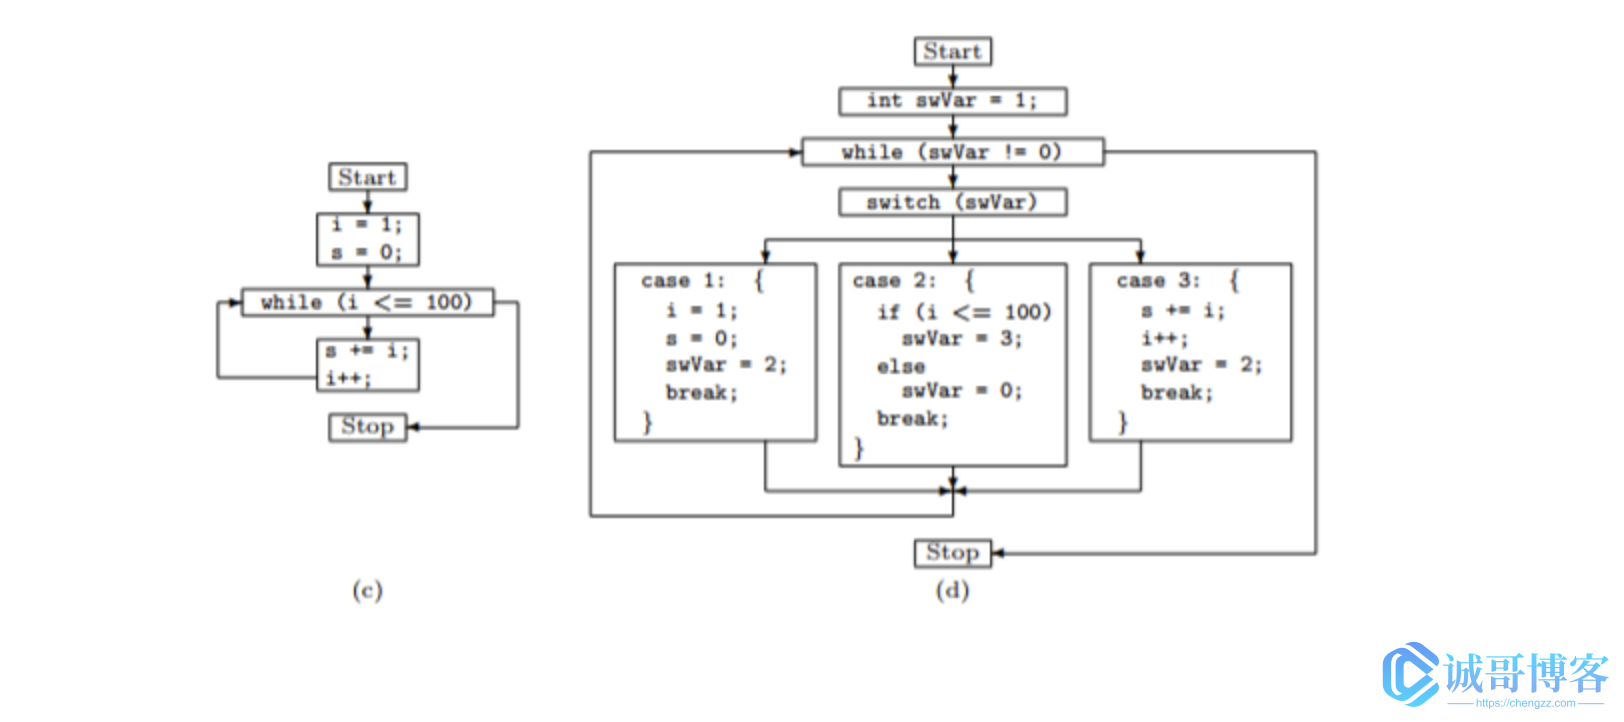
控制流扁平化
#include <stdlib.h>
int main(int argc, char** argv) {
  int a = atoi(argv[1]);
  if(a == 0)
    return 1;
  else
    return 10;
  return 0;
}
展平通道会将此代码转换为以下代码:
#include <stdlib.h>
int main(int argc, char** argv) {
  int a = atoi(argv[1]);
  int b = 0;
  while(1) {
    switch(b) {
      case 0:
        if(a == 0)
          b = 1;
        else
          b = 2;
        break;
      case 1:
        return 1;
      case 2:
        return 10;
      default:
        break;
    }
  }
  return 0;
}
伪控制流
此方法通过在当前基本块之前添加基本块来修改函数调用图。这个新的基本块包含一个不透明的谓词,然后有条件地跳转到原来的基本块。
原始基本块也被克隆并填充了随机选择的垃圾指令。
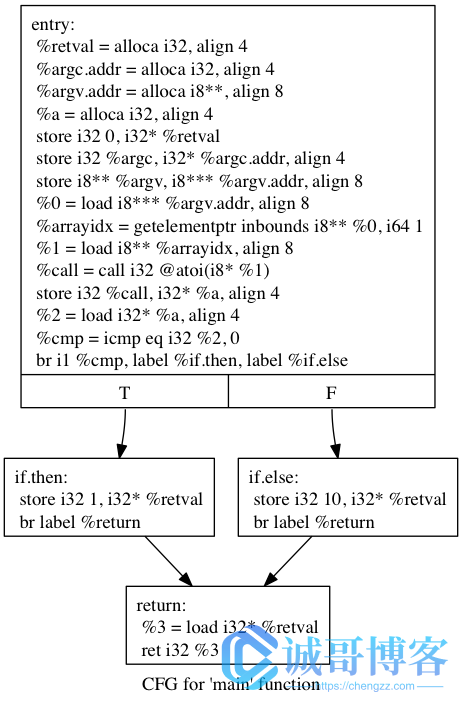
伪造的控制流通过后,我们可能会得到如下流程图:
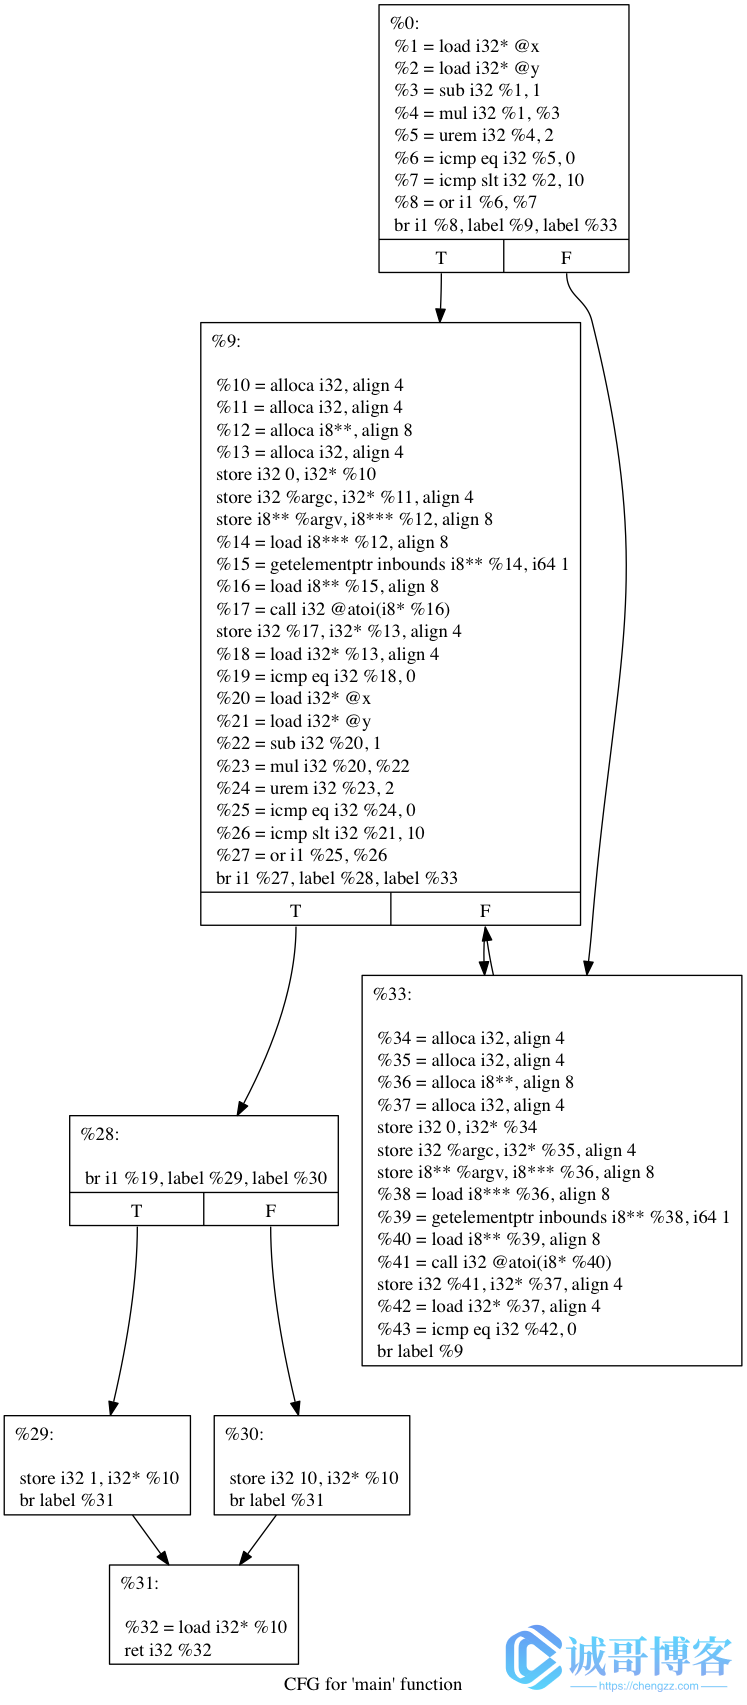
原始 obfuscator 版本现在比较旧,新版使用需要手动移植到新版上使用,而且 linux 上的 llvm 和苹果的还不一样不通用,所以需要的可以自己移植编译,这个混淆效果是这里面最好的,比较全面,之后的混淆都是衍生与此。我自己也移植了 apple-llvm 版本用于使用,编译过程很久,感兴趣的可以自己去试试。
LLVM 介绍
LLVM(Low Level Virtual Machine)是一个开源编译器架构,它被设计成可重用和可扩展的,可以支持多种编程语言和多种操作系统。LLVM 不仅包括编译器的前端和后端,还包括优化器、调试器和模拟器等多种工具和组件。
LLVM 的核心设计思想是将编译器前端和后端分离,前端将源代码转换为 LLVM IR(Intermediate Representation),后端将 LLVM IR 转换为目标机器的代码。这种设计思想使得 LLVM 可以支持多种编程语言和多种目标平台,并且提供了更好的优化和代码生成能力。
LLVM 的优点包括:
- 可重用性:LLVM 的组件可以被重用和组合,从而可以构建定制化的编译器和工具链。
- 可扩展性:LLVM 可以轻松地支持新的编程语言和新的目标平台,只需要实现相应的前端和后端即可。
- 高性能:LLVM 的优化器可以对代码进行多层次的优化,从而提高代码的性能和效率。
- 易于调试:LLVM 的调试器和模拟器可以方便地进行代码调试和测试。
- 开源:LLVM 是一个开源项目,任何人都可以获取源代码并进行修改和定制。
总之,LLVM 是一个灵活、高效、可扩展和可重用的编译器架构,为编译器和相关工具的开发者提供了一个强大的工具和平台。在编译器、静态分析、动态二进制翻译等领域,LLVM 都有着广泛的应用。
Apple LLVM 介绍
Apple LLVM 是苹果公司基于 LLVM 框架开发的 C/C++/Objective-C 编译器,用于编译和构建 macOS 和 iOS 操作系统以及相关应用程序。LLVM 是一个开放源代码的编译器框架,其源代码可以通过 Github 开源项目进行获取。
苹果公司的 LLVM 源代码也是托管在 Github 上的,你可以通过以下链接获取到最新版本的源代码:
https://github.com/apple/llvm-project
该仓库包含了苹果公司 LLVM 编译器的所有源代码,包括 Clang 编译器、LLDB 调试器、LLVM IR(Intermediate Representation)优化器等多个子项目。如果你想深入了解 LLVM 的实现细节,或者想要为 LLVM 贡献代码,可以考虑访问上述仓库,并参与其中的开发活动。